Tuesday, 26 November 2013

How to add bunch of Subscriber And Moderator to mailing list in qmail vpopmail(EZMLM)


I have an old qmail vpopmail system at my office and here is how to installed it you can refer to http://sylvestre.ledru.info/howto/howto_qmail_vpopmail.php. Okay the problem is that I want to create many subscriber to the qmailadmin. You can manually create a subscriber by go to your qmailadmin -> Mailing Lists -> Show Subscribers. How about if we want to add many subscriber let’s say 500 or 1000 email address? Here is the step. I want to start the step how to create mailing list on qmailadmin.
1. Go to your qmail admin, it usually http://localhost/cgi-bin/qmailadmin/ and click New Mailing List

2. Enter the Mailing List Name , List owner email address and set the other option on the below. And after you finish click Add button


3. Your Mailing list suppose to be added successfully, and if you want to add an subscriber you must add them by clicking Add Subscriber button and add them one by one.


4. Waste of time and energy if you added them one by one right? How about if we have to add 100/ 200 email ? :(. Here is how to add many subscriber on the qmail vpopmail (ezmlm).
Go to your mailing list name
# cd /home/vpopmail/domains/example.net/sample-list/
in my case i am going to /home/vpopmail/domains/test.org/test
# cd /home/vpopmail/domains/test.org/test
I have create the mailing list on list.txt and i create then under /home/vpopmail/domains/test.org/test
# vi list.txt
test@test.com
test@another.com
testing@gmail.com
Now we need to run ezmlm-sub command just run
# /path/to/ezmlm-sub `pwd` < /path/to/file/full/of/addresses
in my case
# /usr/local/bin/ezmlm/ezmlm-sub `pwd`< /home/vpopmail/domains/test.org/test/list.txt
then, confirm the subscription:
# /path/to/ezmlm-list `pwd`
in my case

# /usr/local/bin/ezmlm/ezmlm-list `pwd`
testing@gmail.com
test@another.com
test@test.com
by the way, the default ezmlm path is /usr/local/bin/ezmlm
5. You should see the email on the subscriber
now how to add a bunch of moderator to the ezmlm mailing list?
Same as adding subscriber we need to go to your mailing list name
# cd /home/vpopmail/domains/example.net/sample-list/
in my case i am going to /home/vpopmail/domains/test.org/test
# cd /home/vpopmail/domains/test.org/test
And you ned to go to your moderator subdirectory
# cd /home/vpopmail/domains/example.net/sample-list/mod
in my case i am going to /home/vpopmail/domains/test.org/test/mod
# cd /home/vpopmail/domains/test.org/test/mod
I have create the moderator email on modlist.txt and i create then under /home/vpopmail/domains/test.org/test/mod
# vi modlist.txt
moderatortest@test.com
moderator2@another.com
moderator3@gmail.com
Please remember that the modlist.txt files has root permission you need to change it into vpopmail :vchkpw, if did not changes the ownership you cannot delete the moderator email address from your qmailadmin
# chown vpopmail.vchkpw modlist.txt
Now we need to run ezmlm-sub command on /home/vpopmail/domains/test.org/test/mod  just run
# /path/to/ezmlm-sub `pwd` < /path/to/file/full/of/addresses
in my case
# /usr/local/bin/ezmlm/ezmlm-sub `pwd`< /home/vpopmail/domains/test.org/test/mod/modlist.txt
then, confirm the subscription:
# /path/to/ezmlm-list `pwd`
in my case

# /usr/local/bin/ezmlm/ezmlm-list `pwd`
moderator3@gmail.com
moderator2@another.com
moderatortest@test.com
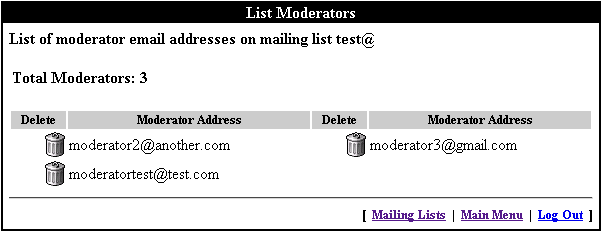
now you can see it on your qmailadmin -> Mailing Lists  -> Your mailing list name -> Show Moderators
Jan 09

What log files are available?
A qmail system is made up of several different programs, all running at the same time and doing their own little part of the overall "mail server" job. Each of these programs generally has its own log file, although if you are using syslog, the logs may be combined together. By understanding what each program does, you can easily tell which log file to look at when you need to check something.
The qmail-send program (which normally runs as a daemontools service called "qmail-send", or maybe just "qmail") manages the queue, and starts all delivery processes. The delivery programs run as children of qmail-queue, and therefore their output is contained with the qmail-queue output. If you have a problem with messages being "stuck" in the queue, this log file should be the place to look.
The qmail-smtpd program handles incoming SMTP traffic. If you have a problem with messages not being properly accepted or rejected from other machines, this log file should be the first place to look. Note that if you have multiple SMTP services on the machine (for example, a standard SMTP service on port 25, an SSL-enabled service on port 465, and an AUTH-only service on port 587) each service will have its own log file (again, unless they are being combined by the syslog mechanism.)
If you are using qmail-scanner as a way to have your incoming mail scanned for viruses and/or spam content, the qmail-scanner program also generates a log file of its own, which is totally separate from the qmail-smtpd log. You will find this file in your qmail-scanner directory, with the name qmail-queue.log. This will have a line-by-line description of everything the qmail-scanner program does.
If you are using simscan as a way to have your incoming mail scanned for viruses and/or spam content, you will normally find simscan’s logs in the qmail-smtpd service log.
If you are using clamav, the "clamd" program keeps its own log file. The /etc/clamd.conf file should have a "LogFile" line which tells you where the log is being written.
If you are using spamassassin, its "spamd" program also generates logs. By default it sends the logs to the syslog with the "mail" facility code, but by adding a "-s" option to spamd’s command line it is possible to send the log output to a file, or to the "standard error" channel (which makes it easy to run spamd under daemontools.) You should examine the command line for spamd in order to figure out where its log file will be found.
Any POP3 or IMAP servers will also be generating their own log entries. If you or your users are having a problem with POP3 or IMAP, those would be the place to look.

Installation of Apache-Tomcat with SSL


1.   Introduction : -

Tomcat is a Java Servlet container and web server from the Jakarta project of the Apache software foundation. A web server dishes out web pages in response to requests from a user sitting at a web browser. But web servers are not limited to serving up static HTML pages; they can also run programs in response to user requests and return the dynamic results to the users’ browser.  Tomcat is very good at this because it provides both Java servlet and JavaServerPages (JSP) technologies (in addition to traditional static pages and external CGI programming). The result is that Tomcat is good choice for use as a web server for many applications; also if you want a free servlet and JSP engine. It can be used standalone or used behind traditional web servers such as Apache httpd, with the traditional server serving static pages and Tomcat serving dynamic servlet and JSP requests.


2.   Required Packages:-

The packages which are being used in <My Company> for configuration are defined below. The package version of these may vary with coming updated version.

i)              apache-tomcat-6.0.33
ii)             jdk1.6.0_22
iii)            Red Hat Enterprise Linux 5.5


3.   Installation:-

i)              Install the RHEL 5.5 operating system on Hardware as defined by <My Company>  OS installation guide.
ii)             Create a tomcat user on Linux server for ownership of tomcat server. For security reasons we will be working in low privilege user mode instead of root user.

Run:

useradd –c  “Tomcat Web Server Account”  -m –d /home/tomcat –s /bin/bash tomcat

iv)           Download apache-tomcat-6.0.33 & jdk1.6.0_22 packages from Internet .


Move these packages into /home/tomcat directory and change ownership to tomcat user.

Run:-

$ cd /home/tomcat
$ chown –R tomcat.tomcat  /home/tomcat/apache-tomcat-6.0.33
$ chown  -R tomcat.tomcat /home/tomcat/jdk1.6.0_22
$ chmod -R u+x /home/tomcat/jdk1.6.0_22/bin


4.   Tomcat  Server Configuration:-

Set the ENVIROMENTAL VARIABLES in /home/tomcat/.bashrc file as defined below.

$ vi /home/tomcat/.bashrc
EDIT:-

#### JAVA & TOMCAT ENVIROMENT VARIABLE DEFINITIONS ####

JAVA_HOME=/home/tomcat/jdk1.6.0_22
CATALINA_HOME=/home/tomcat/apache-tomcat-6.0.33
CATALINA_BASE=/home/tomcat/apache-tomcat-6.0.33
PATH=$JAVA_HOME/bin:$CATALINA_HOME/bin:$PATH
export JAVA_HOME CATALINA_HOME PATH


5.    SSL Configuration:-

i)              Generate keystore file with self-signed Certificate

Tomcat currently operates only on JKS, PKCS11 or PKCS12 format keystores. The JKS format is Java's standard "Java KeyStore" format, and is the format created by the keytool command-line utility.
To create a new keystore from scratch, containing a single self-signed Certificate, execute the following from a terminal command line:

               $JAVA_HOME/bin/keytool -genkey -alias tomcat -keyalg RSA \
                -keystore /home/tomcat/.keystore


After executing this command, you will first be prompted for the keystore password. The default password used by Tomcat is "changeit" (all lower case), although you can specify a custom password if you like. You will also need to specify the custom password in the server.xml configuration file, as described later.

Next, you will be prompted for general information about this Certificate, such as company, contact name, and so on. This information will be displayed to users who attempt to access a secure page in your application, so make sure that the information provided here matches what they will expect.
Finally, you will be prompted for the key password, which is the password specifically for this Certificate (as opposed to any other Certificates stored in the same keystore file). You MUST use the same password here as was used for the keystore password itself. This is a restriction of the Tomcat implementation. (Currently, the keytool prompt will tell you that pressing the ENTER key does this for you automatically.)
If everything was successful, you now have a keystore file with a Certificate that can be used by your server.

ii)             Edit the tomcat configuration file
$ vi $CATALINA_BASE/conf/server.xml
Uncomment the following lines and add keystore file path and define keystore certificate password for SSL configuration for tomcat server. 


<Connector port="8443" protocol="HTTP/1.1" SSLEnabled="true"
                               maxThreads="150" scheme="https" secure="true"
                               keystoreFile="/home/tomcat/.keystore" keystorePass="changeit"
                               clientAuth="false" sslProtocol="TLS" />


Comment out the following entries in server.xml file to disable the tomcat web server to run on http protocol.

              
            <! --
                   <Connector port="8080" protocol="HTTP/1.1"
                                    connectionTimeout="20000"
                                     redirectPort="8443" />
-- >


6.   Start and stop tomcat service to activate the configuration.


Stop tomcat service:

 $CATALINA_HOME/bin/shutdown.sh

Start tomcat service:

 $CATALINA_HOME/bin/startup.sh


7.   Enable Logging:-

Edit the server.xml file to enable logging for tomcat server.

$ vi $CATALINA_HOME/conf/server.xml

<Valve className="org.apache.catalina.valves.AccessLogValve" directory="logs"   prefix="localhost_access_log." suffix=".txt" pattern="combined" resolveHosts="false"/>

The Logs are generated in $CATALINA_HOME/logs directory which can be analyzed for troubleshooting of tomcat server.


8.   Configure Heap Size in Tomcat 6.0:-

Stop Tomcat server, set environment variable CATALINA_OPTS, and then restart Tomcat. Look at the file tomcat-install/bin/catalina.sh or catalina.bat for how this variable is used. For example,
 Edit $CATALINA_HOME/bin/catalina.sh
export CATALINA_OPTS="-Xms1024m -Xmx1024m -XX:PermSize=256m XX:MaxPermSize=1024m"

9.   Finalization:-


After completing these configuration changes, you must restart Tomcat as you normally do, and you should be in business. You should be able to access any web application supported by Tomcat via SSL. For example, try:

http://tomcat.apache.org/tomcat-6.0-doc/images/void.gif
https://localhost:8443
http://tomcat.apache.org/tomcat-6.0-doc/images/void.gif

Tuesday, 19 November 2013

Creation of Global Address Book in Squirrelmail & Qmail

Qmail Server is running as mail server for my domain example.com. I have to create an address book in which all users mail ids will exist. When I login into squirrelmail web page and go to AddressBook link, by default no entry exist there. I will create Addressbook into this link for all users in domain example.com.  

The “vpasswd” file contains user information for all mail users. I will fetch data from”vpasswd” file and will create address book data using script “Address_Book” below.

[root@qmail ~]# cat /home/vpopmail/domains/example.com/vpasswd

vts:$1$iwli/pnP$6eAKRCs1yf3RdiiRKdGSJ1:1:0:V T Subramanian:/home/vpopmail/domains/example.com/0/vts:524288000S:2yff5cf9lZ
wzo:$1$/Y0lHFfy$a01lFirzDbARvkbASejfY/:1:0:Mumbai RO:/home/vpopmail/domains/example.com/wzo:524288000S:#WIDwxa9Vc
yksingh:$1$8x5rS9zL$i1K8J/ztVK0M52rMxVvpi0:1:0:Y K Singh:/home/vpopmail/domains/example.com/0/yksingh:524288000S:YPdadkN*R
ysaxena:$1$6nEpFJE0$aLB4dQutFy2siPxJX/ZzG1:1:0:Yogesh Saxena:/home/vpopmail/domains/example.com/ysaxena:524288000S:uhd0rjswq.


[root@qmail ~]# vi /scripts/Address_Book

#!/bin/bash

SAVEIFS=$IFS
IFS=$(echo -en "\n\b")

rm -rf default_abook

for i in `cat /home/vpopmail/domains/example.com/vpasswd`
 do
   echo $i > users
   mailid=$(awk -F":" '{print $1}' users)
   nameid=$(awk -F":" '{print $5}' users)

   echo "$mailid|$nameid||$mailid@example.com|" >> default_abook
   cp -f default_abook  /opt/webmail/squirrelmail/data/default_abook
 done

[root@qmail ~]# chmod 755 /scripts/Address_Book

[root@qmail ~]# crontab  -e

00 02 * * *  /scripts/Address_Book

We will set the name of global address book in squirrelmail configuration.


[root@qmail ~]# cd /opt/webmail/squirrelmail
[root@qmail squirrelmail]# ./configure
SquirrelMail Configuration : Read: config.php (1.4.0)
---------------------------------------------------------
Main Menu --
1.  Organization Preferences
2.  Server Settings
3.  Folder Defaults
4.  General Options
5.  Themes
6.  Address Books
7.  Message of the Day (MOTD)
8.  Plugins
9.  Database
10. Languages

D.  Set pre-defined settings for specific IMAP servers

C   Turn color on
S   Save data
Q   Quit

Command >> 6

SquirrelMail Configuration : Read: config.php (1.4.0)
---------------------------------------------------------
Address Books
1.  Change LDAP Servers
2.  Use Javascript Address Book Search          : false
3.  Global file address book                    : default_abook
4.  Allow writing into global file address book : false

R   Return to Main Menu
C   Turn color on
S   Save data
Q   Quit

Command >>3
Global file address book: default_abook
And Save and Exit.

The Global Book will be displayed into Squirrelmail webmail like below screen.


Thursday, 24 October 2013

Step by Step Free Radius Configuration authenticated by LDAP

I am installing Free-Radius Server integrated with OpenLDAP server on CentOS 5.5 using kernel 2.6.18-194.el5. I will install all packages using yum configured on CentOS server. You can configure OpenLDAP using my blog using Link http://jitendrakumaryogi.blogspot.in/2013/09/ldapsamba_23.html. After Installing OpenLDAP you can configure Free-Radius Server.

I am checking the CentOS configuration on Server.

[root@ldapnoida ~]# cat /etc/redhat-release
CentOS release 5.5 (Final)
[root@ldapnoida ~]# uname -a
Linux ldapnoida.example.com 2.6.18-194.el5 #1 SMP Fri Apr 2 14:58:14 EDT 2010 x86_64 x86_64 x86_64 GNU/Linux

You can Install FreeRadius packages on server using yum.

[root@ldapnoida ~]# yum install freeradius*

It will install following FreeRadius Packages on server.

[root@ldapnoida ~]# rpm -qa | grep radius
freeradius2-krb5-2.1.12-5.el5
freeradius2-postgresql-2.1.12-5.el5
freeradius2-utils-2.1.12-5.el5
freeradius2-python-2.1.12-5.el5
freeradius2-2.1.12-5.el5
freeradius2-ldap-2.1.12-5.el5
freeradius2-mysql-2.1.12-5.el5
freeradius2-unixODBC-2.1.12-5.el5
freeradius2-perl-2.1.12-5.el5

Once the installation is complete, “/etc/raddb” directory is created which contains all configuration files of FreeRadius server.

[root@ldapnoida raddb]# cd /etc/raddb/
[root@ldapnoida raddb]# vi eap.conf

default_eap_type = md5

 Now, open the file named “ldap” In “/etc/raddb/modules” directory and change the configuration to the following:

[root@ldapnoida raddb]# cd modules/
[root@ldapnoida modules]# pwd
/etc/raddb/modules
[root@ldapnoida modules]# vi ldap

ldap {
        #
        #  Note that this needs to match the name in the LDAP
        #  server certificate, if you're using ldaps.
        server = "127.0.0.1"                                         # Local LDAP Server on same host
        identity = "cn=Manager,dc=example,dc=com"  #ldap Account to Manage LDAP server
        password = root123                                         # Password of above mentioned ldap account
        basedn = "dc=example,dc=com"
        filter = "(uid=%{%{Stripped-User-Name}:-%{User-Name}})"


Now open file “ /etc/raddb/sites-available/default” and change the following parameters into authorize section in this file.

[root@ldapnoida sites-available]# vi /etc/raddb/sites-available/default

authorize {
        #  The ldap module will set Auth-Type to LDAP if it has not
        #  already been set
        ldap                                                               #Uncomment ldap
        #  Read the 'users' file
        #  files                                                           #Comment files


Now open file “/etc/raddb/sites-available/inner-tunnel” and change the following parameters into authorize and authenticate section in this file.

[root@ldapnoida sites-available]# vi /etc/raddb/sites-available/inner-tunnel

authorize {
        #  Read the 'users' file
        #  files                                                                           #Comment files
        #  The ldap module will set Auth-Type to LDAP if it has not
        #  already been set
        ldap                                                                               #Uncomment ldap


authenticate {

 # Uncomment it if you want to use ldap for authentication
 #
        # Note that this means "check plain-text password against
        # the ldap database", which means that EAP won't work,
        # as it does not supply a plain-text password.
        Auth-Type LDAP {
                ldap
        }


Open the “clients.conf” file and edit the IP address at 34th line of file i.e. ip address and enter the IP address of your radius server. Edit the client section to allow the APs (Access Points) to communicate with your radius server. Configuration would something look like this:

[root@ldapnoida raddb]# vi /etc/raddb/clients.conf

client 10.226.0.0/16 {
        secret          = 1234                                               # Radius Secret Key to give on Access Points
        shortname       = radping                                        # It is User Defined name of your choice
}


 Run the radius server in debug mode with “radius -X” and try to authenticate a user.


Testing of Radius Server authenticated with LDAP Server.

My Radius & Ldap Server IP Address is 10.226.2.66 which will be used for testing.

[root@ldapnoida raddb]# ifconfig
eth0      Link encap:Ethernet  HWaddr 00:50:56:90:01:0D
          inet addr:10.226.2.66  Bcast:10.226.15.255  Mask:255.255.240.0
          inet6 addr: fe80::250:56ff:fe90:10d/64 Scope:Link
          UP BROADCAST RUNNING MULTICAST  MTU:1500  Metric:1
          RX packets:65186388 errors:0 dropped:0 overruns:0 frame:0
          TX packets:674273 errors:0 dropped:0 overruns:0 carrier:0
          collisions:0 txqueuelen:1000
          RX bytes:9508735851 (8.8 GiB)  TX bytes:113603579 (108.3 MiB)

You can download NTRadPing tool from Link http://www.novell.com/coolsolutions/tools/14377.html and test the Radius user authentication using this tool.


As per picture I authenticated admin user on ldap using radius and it is accepted and access is given.

 [root@ldapnoida raddb]# radiusd –X

radiusd: #### Opening IP addresses and Ports ####
listen {
        type = "auth"
        ipaddr = *
        port = 0
}
listen {
        type = "acct"
        ipaddr = *
        port = 0
}
listen {
        type = "control"
 listen {
        socket = "/var/run/radiusd/radiusd.sock"
 }
}
listen {
        type = "auth"
        ipaddr = 127.0.0.1
        port = 18120
}
 ... adding new socket proxy address * port 49997
Listening on authentication address * port 1812
Listening on accounting address * port 1813
Listening on command file /var/run/radiusd/radiusd.sock
Listening on authentication address 127.0.0.1 port 18120 as server inner-tunnel
Listening on proxy address * port 1814
Ready to process requests.
rad_recv: Access-Request packet from host 10.226.1.206 port 37858, id=0, length=45
        User-Name = "admin"
        User-Password = "root123"
# Executing section authorize from file /etc/raddb/sites-enabled/default
+- entering group authorize {...}
++[preprocess] returns ok
++[chap] returns noop
++[mschap] returns noop
++[digest] returns noop
[suffix] No '@' in User-Name = "admin", looking up realm NULL
[suffix] No such realm "NULL"
++[suffix] returns noop
[ntdomain] No '\' in User-Name = "admin", looking up realm NULL
[ntdomain] No such realm "NULL"
++[ntdomain] returns noop
[eap] No EAP-Message, not doing EAP
++[eap] returns noop
[ldap] performing user authorization for admin
[ldap]  expand: %{Stripped-User-Name} ->
[ldap]  ... expanding second conditional
[ldap]  expand: %{User-Name} -> admin
[ldap]  expand: (uid=%{%{Stripped-User-Name}:-%{User-Name}}) -> (uid=admin)
[ldap]  expand: dc=example,dc=com -> dc=example,dc=com
  [ldap] ldap_get_conn: Checking Id: 0
  [ldap] ldap_get_conn: Got Id: 0
  [ldap] attempting LDAP reconnection
  [ldap] (re)connect to 127.0.0.1:389, authentication 0
  [ldap] bind as cn=Manager,dc=example,dc=com/root123 to 127.0.0.1:389
  [ldap] waiting for bind result ...
  [ldap] Bind was successful
  [ldap] performing search in dc=example,dc=com, with filter (uid=admin)
[ldap] looking for check items in directory...
  [ldap] userPassword -> Password-With-Header == "{crypt}x"
  [ldap] sambaNtPassword -> NT-Password == 0x3836313939443144384638323935373639354134304642453632443346443846
[ldap] looking for reply items in directory...
[ldap] user admin authorized to use remote access
  [ldap] ldap_release_conn: Release Id: 0
++[ldap] returns ok
++[expiration] returns noop
++[logintime] returns noop
[pap] Normalizing NT-Password from hex encoding
++[pap] returns updated
Found Auth-Type = PAP
# Executing group from file /etc/raddb/sites-enabled/default
+- entering group PAP {...}
[pap] login attempt with password "root123"
[pap] Using NT encryption.
[pap]   expand: %{User-Password} -> root123
[pap] NT-Hash of root123 = 86199d1d8f82957695a40fbe62d3fd8f
[pap]   expand: %{mschap:NT-Hash %{User-Password}} -> 86199d1d8f82957695a40fbe62d3fd8f
[pap] User authenticated successfully
++[pap] returns ok
# Executing section post-auth from file /etc/raddb/sites-enabled/default
+- entering group post-auth {...}
++[exec] returns noop
Sending Access-Accept of id 0 to 10.226.1.206 port 37858
Finished request 0.
Going to the next request
Waking up in 4.9 seconds.
Cleaning up request 0 ID 0 with timestamp +12
Ready to process requests.


___________________________________________________________

Please give your feedback.

Tuesday, 22 October 2013

Script to Generate Alert for Root User Password Expiration


Here i created a script that will check the expiry of root user and generate the alert to system administrator through mail since one month ago of password expiration. Here i considered 90 days of expiration of root user and alert will be generated after 60 days. I mentioned my mail id here in place of system admin mail id. You can specify your mail id in variable RECIP.

# vi  root_expir_alert

#!/bin/bash

HOST=`uname -n`
USER=`id -u`
RECIP="jitendrakumaryogi@gmail.com"
MAX=60
SYS=`uname`

#--- Need root permissions to run script

if [[ $USER -ne 0 ]];
           then
    echo "Must be root to run this script!!"
else 
                exit 2
   fi

#--- Number of Days since 1st Jan 1970 of root Password Change
DAYS=`grep $USER /etc/shadow | cut -d: -f3`

#--- Number of Days since 1st Jan 1970 to till date
DATE=`perl -e 'print int(time/(60*60*24))'`

#--- Compute the Age of the user's password
AGE=`echo $DATE - $DAYS | bc`

NOTIFY="The user's password is $AGE days old on $HOST"

if [[ $SYS == Linux ]];
   then
DAYS=`grep $USER /etc/shadow | cut -d: -f3`
fi

#--- If User expiry is 90 Days Alert will be generated 30 Days ago and mailed to user.

if [[ $AGE -ge $MAX ]];
   then
WARN=`echo 90 - $AGE | bc`
echo $NOTIFY | mail -s "Root Password will expire in $WARN days"  $RECIP

fi


Now you can set this script in crontab daily on particular time. I am scheduling this script daily on 12:00 AM.

# crontab -e

00 00 * * *  /scripts/root_expir_alert